Next.js’ version 10.0.0 release in October of 2020 came with exciting news for developers – built-in image optimization thanks to its brand-spanking new Image Component. By automatically applying certain best practices and steering developers towards adopting them, it promises to help developers stay on top of optimizing performance for image-heavy web apps.
Advanced, intelligent image CDNs, such as ImageEngine, already provide many of these benefits. Which makes one wonder if Image Component is here to replace image CDNs or join forces with them. In this article, we’ll try to answer this question by comparing the accessibility, features, and performance of both image optimization toolboxes.
How to get Started with Image Component and ImageEngine
Since version 10.0.0, Image Component is now included in the main Next.js build. That means with any Next.js installation in this version or higher automatically comes with the Image Component module. This can be found on the package under “next/image.js”.
As such, to use Image Component in your Next.js project, use the standard import header:
import Image from 'next/image'
Whenever one wants Image Component to optimize an image in your app, all they have to do is replace the typical <img>> folder. tag with the following:
<Image src="/myimage.jpg" width={400} height={400} alt="Just an optimized image"/>
Like all other static assets, the image is located using a relative path from the /public folder.
Support for a number of image CDNs have already been implemented (imgix, Cloudinary, and Akamai) with CDN-specific loaders.
There is currently an active pull request in the works to include an ImageEngine loader as well. While this should be merged into the main Next.js branch soon, it’s relatively arbitrary to implement manually in your Next.js installation.
To use ImageEngine on top of Next.js’ Image Component, the first thing needed is to sign up for a free trial here. As part of the process, provide ImageEngine with the web location where the images are currently hosted, such as a web folder, AWS S3, or Google Storage bucket. At the end of the signup, trialers will receive an image serving domain similar to {random_string}.cdn.imageng.in
Check out the quick start guide for more info.
To serve ImageEngine images in the Next.js app, replace relative url with the image location on the image serving domain:
<img src="myimages.cdn.imgeng.in/myimage.jpg" alt="Just a picture from the ImageEngine domain"/>

Struggling to get your SEO just right? Start with your image optimization, and start with our blog!
Features
Since we’re looking at a use case for utilizing ImageEngine on top of Next.js and the Image Component, let’s start with Image Component’s features. There are a number of built-in features that will make developers’ lives easier from the get-go:
- Lazy-loading images
- Automatic optimization via:
- The next-gen WebP format
- Resizing
- Quality downscaling
Don’t be worried about all of this extra processing affecting build times. Optimized images are generated and fetched on-demand as users request them. ImageEngine also generates optimized images on its own optimization engine and serves them dynamically, also leaving build times unaffected.
So, trialers get the benefits of two optimization engines with no additional build-time performance hit. That’s a bargain.
Someone might think that, thanks to the good people at Vercel, there’s no more need for you to worry about image optimization. However, ImageEngine can bring a number of additional benefits to the table:
- Native support for client hints, including the Save-Data: on header
- Additional formats:
- JPEG-2000 for Safari browsers
- GIFs will be converted to MP4/WebP
- The new AVIF image format for newer Chrome browsers
- More “intelligent” automatic optimization thanks to:
- WURFL device detection, and
- Dynamically adjusting image quality according to the accessing device’s PPI
This final bullet is the main driver behind ImageEngine consistently providing higher rates of compression while maintaining image quality, even among other image CDNs.
As the tests at the end of this article show, these additional capabilities lead to tangible performance improvements.
For this, we won’t go too much into ImageEngine’s Edge Network, although it’s a major contributor to the image CDNs efficacy. It consists of over 20 globally-positioned PoPs, with device-aware edge servers built into the business-logic. It also improves cache hit-ratios for image content up to 98%.
Using a deployment platform like Vercel, one can get similar benefits for the code-side of an app.
One way in which Image Component can augment ImageEngine is when it comes to lazy loading. ImageEngine’s best practices highly recommend implementing native lazy loading, and Image Component now does that automatically.

Looking to implement Client Hints with Magento? We've got you covered!
Taking Control of Image Content – Image Properties
There are times where one would rather specify serving images in specific formats, at a specific quality, or according to specific dimensions. Again, both Image Component and ImageEngine provide these capabilities.
The only difference is that users will pass these commands to Image Component using HTML-like properties, while users will pass them to ImageEngine using URL parameters. Here’s a comparison of supported directives:
Image Component
- width - required unless layout="fill"
- height - required unless layout="fill"
- layout – fixed (no resizing for any viewport), intrinsic (default – no resizing for larger viewports), fill (stretch to fill entire viewport width)
- sizes – display sizes for different viewports
- quality – sets relative image quality on a 0-100 scale
- loading - Default lazy. Eager loads image at page load
- priority – if true, preloads image
- unoptimized – no automatic optimization will apply
- unsized – deprecated in favor of layout
ImageEngine
- w – width
- w_auto – auto width
- h – height
- cmpr – compression
- f – format
- m – fit method
- pass – pass through
- s – sharpness
- r – rotate
- pc – percentage of screen
- cr – crop
- in – inline
- meta – keep/strip EXIF data
So, for example, one could generate an image with the dimensions of 500px by 500 px with 75% compression using the following line:
<Image src="/myimage.jpg" width={500} height={500} alt="Just an optimized image" quality={75}/>
Using ImageEngine, users can generate the same image like this:
<img src="//myimages.cdn.imgeng.in/myimage.png?imgeng=/w_500/h_500/cmpr_75">
ImageEngine and Image Component have the potential to complement each other nicely. ImageEngine provides image transformation controls, such as rotation, sharpness, and cropping. On the other hand, Image Component allows users to have finer control over which size of image will be displayed using the size attribute and by specifying image and device sizes in next.config.js.
The Image Component documentation asserts that setting width and height properties is a requirement unless layout=fill is set. This is to avoid “jumpy” image loading that will affect layout stability. This is best practice whenever dynamically loading images.
The main benefit promised by using both Image Component and ImageEngine is to tangibly boost website performance in terms of page load times. However, equally important, is to improve an app’s various user-centric performance metrics, as most recently expressed by Google’s Core Web Vitals.
This will directly result in delivering a better user experience as well as boost website SEO rankings. Running a Lighthouse audit below will prove the types of performance enhancements one can expect. Furthermore, in light of Google’s shift to mobile-first thinking, we’ll be running Lighthouse for mobile viewports.
First, take a look at a next.js app (deployed on Vercel) with zero image optimization:
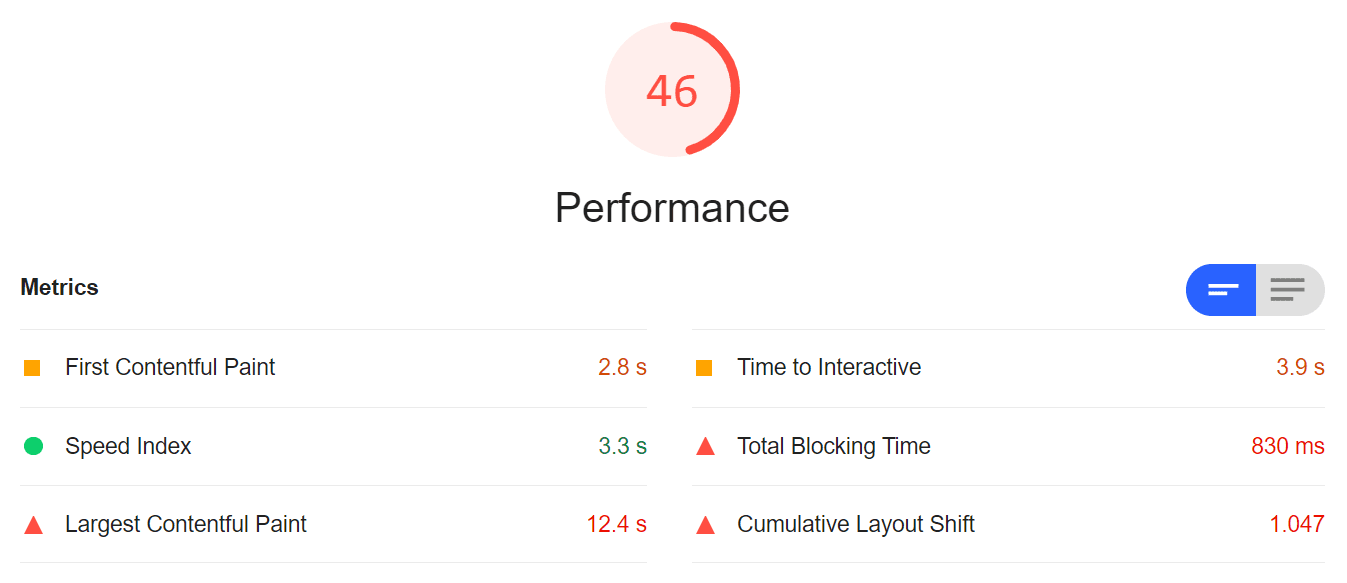
And, here are the opportunities for improvement:
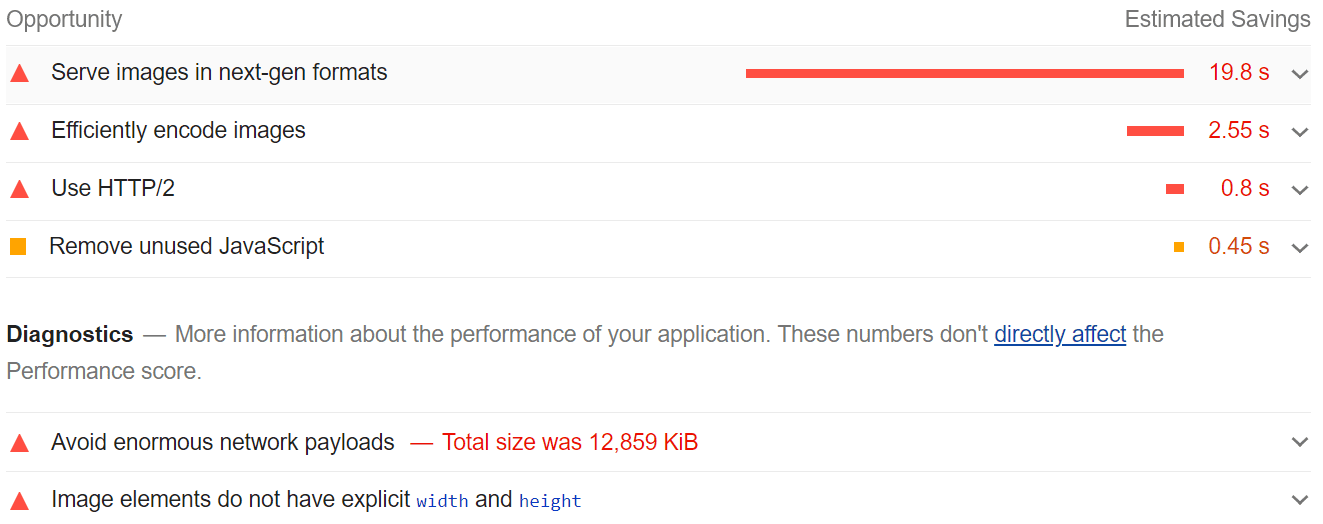
That’s pretty terrible. Thanks to Vercel’s CDN, overall content delivery speeds aren’t too bad. However, Core Web Vitals like LCP, CLS, and FID (as interpreted by TTI and Blocking Time) scored horribly. Visitors will also have to download images at their full size. To properly highlight the difference between optimization methods, the test uses oversized images with large file sizes – leading to a total payload of 13 MB.
This can be improved somewhat using responsive syntax (or by setting width and height properties for all images). However, this isn’t a scalable or future-proof solution, particularly at massive scales.
Next up is the same Next.js app, but with images loaded using the built-in image component:
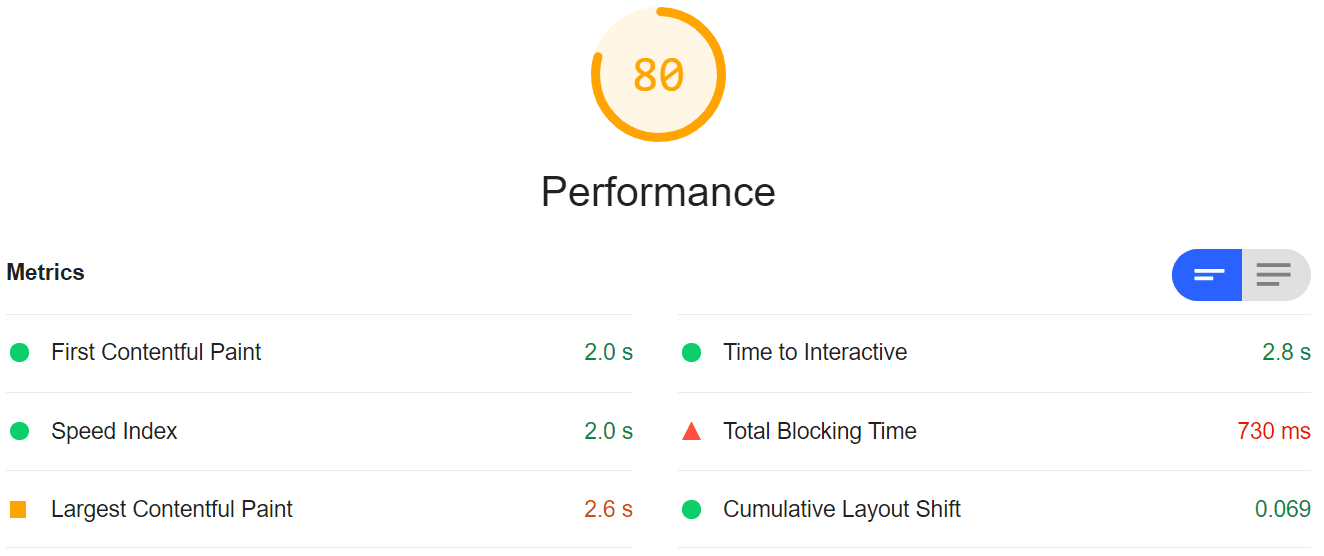
As one can see, our metrics improved across the board. Perhaps, most importantly, is that LCP and Speed Index was brought down to below the all-important 3s milestone. Image Components automatic resizing and compression did well, bringing down the total payload to 1,709 KB – roughly 97% in savings.
Image Component was developed with Google’s Core Web Vitals in mind, of which Cumulative Layout Shift (CLS) is just one. The developers also seem serious about keeping Image Component up to date with the latest developments on this front.
The same goes for ImageEngine, which has already been proven to dramatically improve most user-centric performance metrics. With that in mind, let’s check how ImageEngine did:
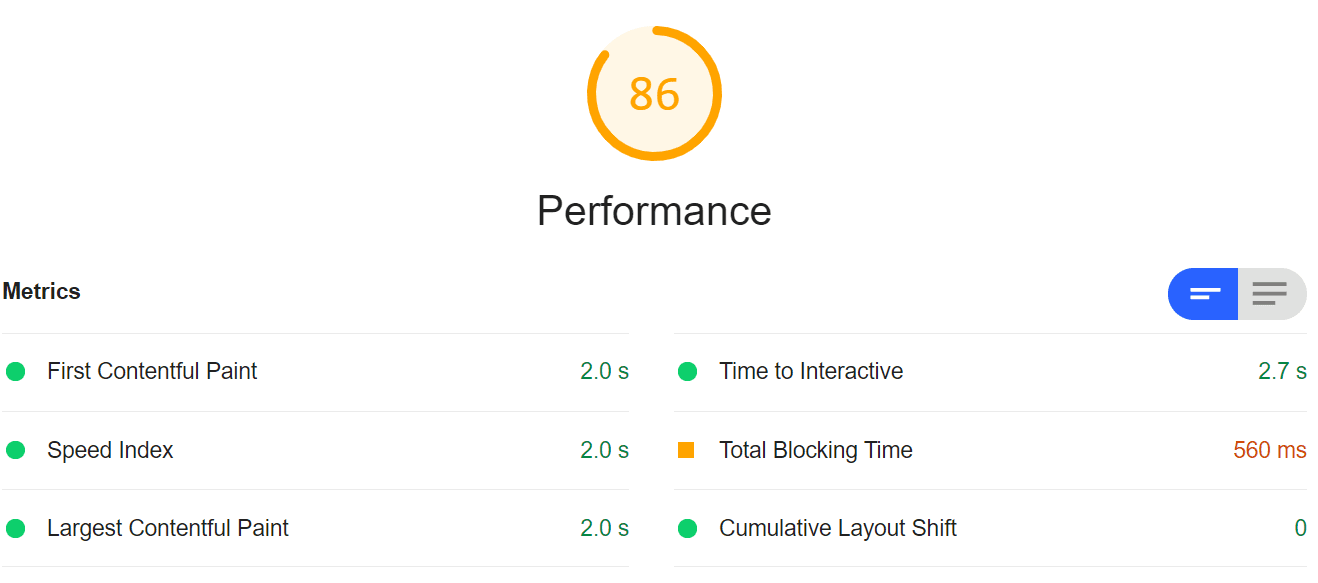
Although less dramatic, ImageEngine made another all-around improvement to performance metrics. Most importantly, CLS was reduced to the best possible score and LCP was brought down to two seconds flat.
This means both achieve faster and more stable loading of image content.
Not to mention, that these results were achieved without lifting a finger to optimize images manually. Every single point was gained with Image Component and ImageEngine’s automatic efforts.
Image Optimization – Work Smarter, Not Harder
Next.js has become a developer favorite thanks to a number of quality-of-life features. Now, taking the tedious task of implementing adaptive, scalable, and intelligent image optimization out of developers hands is one of them.
Still, for the same – if not less – amount of effort, the ImageEngine image CDN can provide even better immediate results.
Going forward, both will help developers stay on top of best practices and, to some degree, future-proof your app against upcoming developments. With native ImageEngine support just around the corner, you can soon expect the best of both worlds.
